Maximizing Small Spaces: Container Gardening Tips for Urban Dwellers
Share this article:
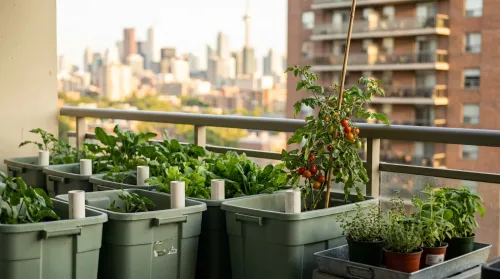
42 sq ft, 3h20 of June sun, 21 lbs of harvest. Container gardening for small spaces is a discipline — start by measuring what you have.
My balcony faces north-east, runs forty-two square feet, and sits six floors above a Toronto street that funnels wind off the lake from late April through October. By any reasonable standard, it is a difficult place to grow food. It is also where I have been documenting a container gardening experiment since 2017, and where the cherry tomato in the corner produced through three heatwaves last summer because the sub-irrigated planter underneath it did the watering for me.
Most of what follows is what I wish someone had told me in 2017, before I bought the wrong planter, killed the wrong plant, and discovered that the conventional wisdom often assumes a back garden I do not have.
Will your balcony hold this?
The first question urban container gardening literature almost never asks: can your floor take it?
A filled five-gallon (about nineteen-litre) container weighs roughly fifty pounds (twenty-three kilograms) once you factor in the wet potting mix, the pot, the water in the saucer, and a mature plant. Most residential balconies in North America are rated for a distributed live load of 40 to 100 pounds per square foot — code minimums vary by jurisdiction and building age. Doing the arithmetic, two filled five-gallon pots per square foot is the practical ceiling before you start eating into the safety margin reserved for furniture, you, and a guest holding a pint.
A few rules worth following:
Heaviest pots closest to the building wall, never near the railing. Live-load capacity is highest where the slab meets the structural wall and lowest at the cantilevered edge.
Distribute, do not cluster. Six small pots spread across two square feet is structurally easier than one massive planter in the corner.
Read your lease before you build anything. Many rental and condo agreements restrict railing-mounted planters, drilling, and exterior modifications. Ask in writing; keep the reply.
The protocol takes thirty minutes of attention spread across one sunny day:
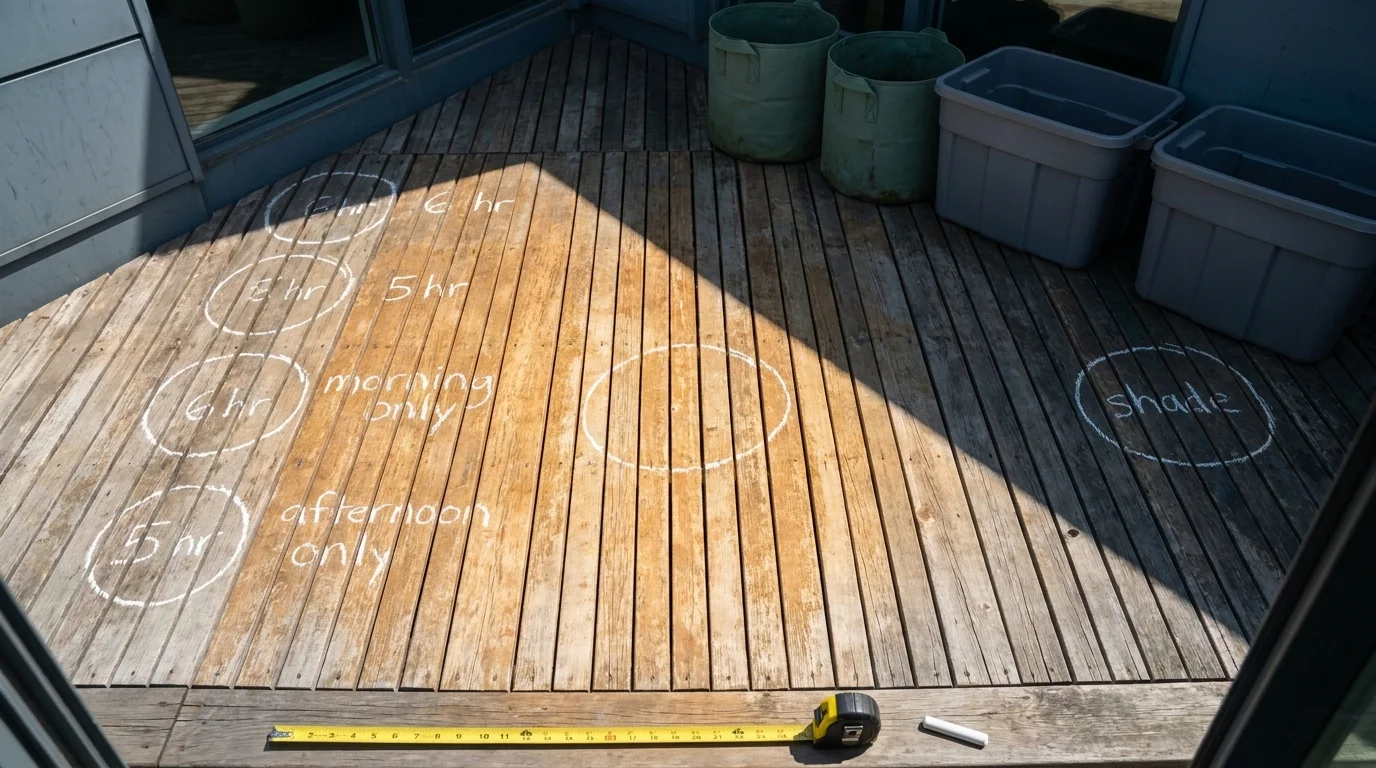
Stand on your balcony at 8 a.m. with your phone. Take a single photo straight out toward where the sun should be.
Repeat at 10, 12, 2, 4, and 6.
Open the six photos as a strip. The pattern of shadow across the floor is your light map.
Mark the spots that receive direct sun for at least six hours. Those are your tomato, pepper, and pepper-shaped-things zones. Everywhere else is leafy greens, herbs, or shade tolerators.
The conventional wisdom says cherry tomatoes need full sun. On a north-facing balcony with a four-hour direct window, the conventional wisdom is wrong, and the answer is to stop trying to grow indeterminate slicers and switch to a determinate cultivar bred for short days. Which brings us to plant selection.
Loading image...
Map the sun before you place the pot. Five chalk circles at solar noon saves a season of moving a 50-lb saturated planter the wrong way.
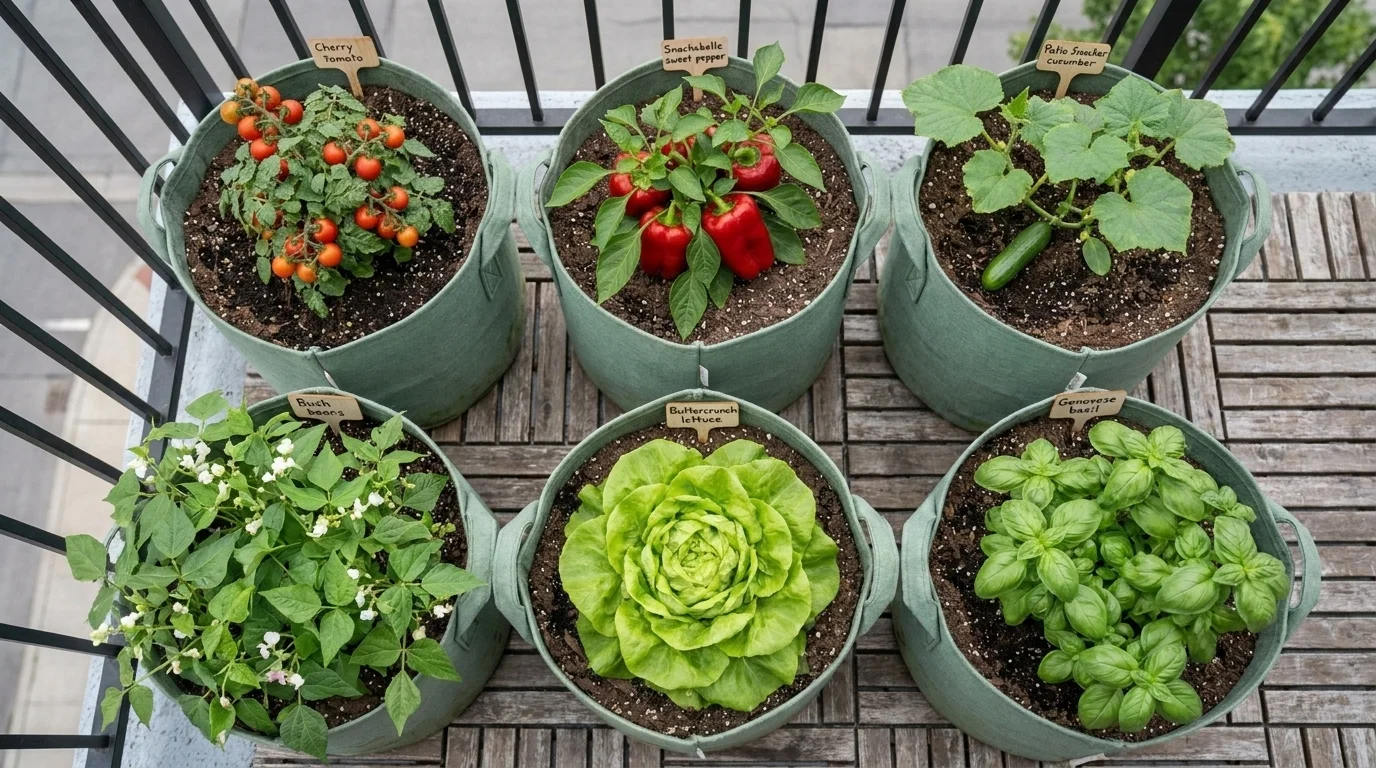
The cultivar names matter more than they used to. Between 2023 and 2026 the seed industry has launched a wave of varieties bred specifically for pot culture, and the naming convention tells you the audience: 'Patio', 'Porch', 'On Deck', 'Veranda'. These are not marketing dressings on the same old plants — they are genuinely shorter, bushier, faster-maturing selections that fruit before they outgrow their root volume.
Buy the cultivar, not the catalogue photo. A 'Patio Snacker' cucumber will fruit in a five-gallon pot. A standard slicing cucumber from the same display rack will sulk and produce nothing.
Mint goes in its own pot, always. It will colonise a shared planter inside one season.
One determinate tomato per five-gallon pot. Two is not double the harvest; it is half the harvest, twice the watering, and a guaranteed case of blossom-end rot.
Loading image...
Cultivar labels matter more than container size. A determinate cherry in a 5-gallon bag beats an indeterminate. Buy dwarf, patio, bush — every time.
Sub-irrigated planters: the self-watering question
This is the part of small-space container gardening I have spent the most money learning, and I am going to save you some of it.
Let me save you the forty dollars I wasted on a self-watering planter from a big-box store. The reservoir was too small, the wicking strip was a joke, and the whole thing overheated by the second week of August. The plant was a determinate tomato and it survived only because I started watering it manually anyway, which defeated the entire purpose. The category has a real engineering problem at the cheap end.
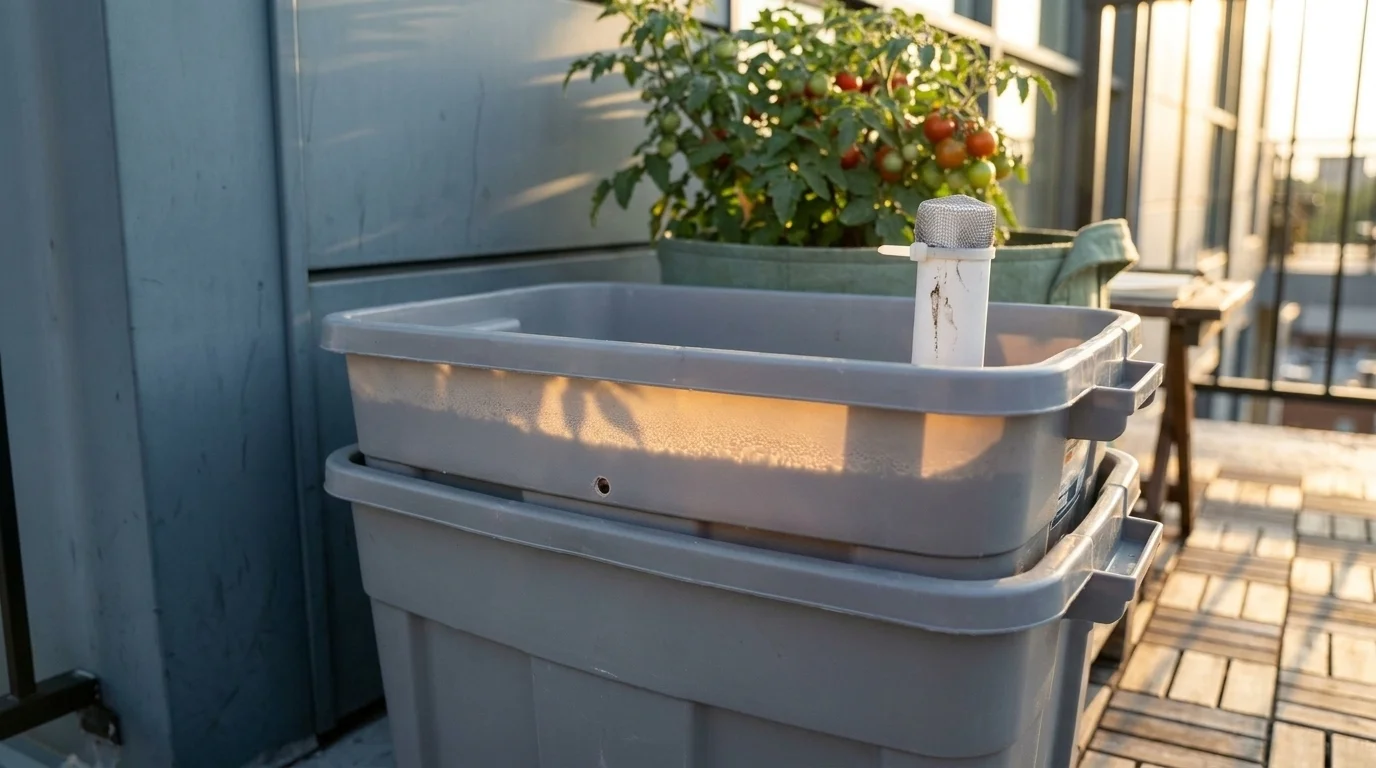
A proper sub-irrigated planter — what horticulturists call a SIP — is not complicated: two nested containers, an air gap at the bottom, a fill tube running up the side, an overflow drain set at the reservoir line, and a wicking column of potting mix running down to the water. The plant pulls water up by capillary action as the roots demand it. You fill the reservoir, you walk away, and on a typical mid-August day on a Toronto balcony you do that once every three to four days instead of once or twice a day.
The DIY build, which I now use for every long-season crop on my balcony:
Two nested 8-gallon (30-litre) plastic storage totes, the kind sold at any hardware store for about five dollars apiece
A length of half-inch (13 mm) PVC pipe for the fill tube
A 3-inch (75 mm) plastic mesh strainer or yoghurt cup for the wicking column
A small drilled hole at the reservoir-line height for overflow
Total build: $14.60 in materials, one Saturday afternoon, zero holes in the wall, zero modifications to the rental unit. It will hold a determinate tomato through a seventy-two-hour heatwave without me touching it.
A couple of caveats. SIPs do not suit every crop — herbs that prefer dry feet (rosemary, oregano, thyme) hate the constant moisture and you should grow those in conventional terracotta. And a SIP needs an honest potting mix with strong wicking properties; standard outdoor garden soil will compact and choke the system inside a season. Use a peat- or coir-based mix labelled for container culture.
Loading image...
$14.60 in materials, one Saturday, zero holes in the wall. Holds a tomato through a 72-hour heatwave. Big-box version cost more and quit by August.
A watering rhythm that actually fits an apartment schedule
Even with SIPs handling the long-season crops, the rest of the balcony needs a routine.
The diagnostic everyone should learn: press a finger one inch (2.5 cm) into the potting mix. If it comes out dry, water until the drainage saucer fills. In summer, a small (one- to three-gallon) pot in direct afternoon sun may need this twice a day during a heatwave. A self-watering reservoir pot can stretch to weekly. Morning watering is preferred — wet leaves overnight invite fungal problems on tomatoes and basil.
For renters who travel, a no-drill drip irrigation kit pays for itself the first time you leave town. Battery-timed drippers attach to a threaded faucet adapter or, for kitchens with no outdoor tap, a gravity-fed reservoir bucket. Beyond convenience, Rain Bird homeowner data shows drip irrigation uses up to 50 percent less water than overhead methods, which matters when your water is metered or when the building has restrictions during summer drought advisories.
A note on saucers: if you live above another tenant, the drainage saucer is not optional and it is not a decoration. Overflow that drips onto the balcony below is one of the fastest ways to lose your gardening privileges. A 2-inch (5 cm) deep saucer under every pot, emptied weekly so it does not become a mosquito breeder.
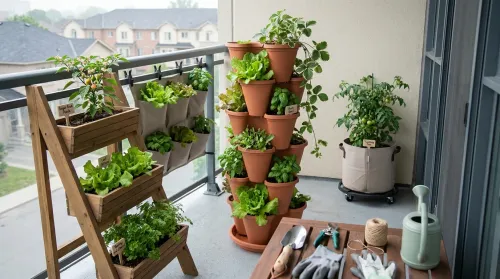
Vertical gardening that respects the wall
Vertical growing on a balcony is a real solution and also one of the most over-promised. The conventional wisdom says any wall can be a garden. The conventional wisdom does not pay your security deposit.
What works in a rental:
Free-standing trellises in heavy planters — a five-gallon pot with a four-foot bamboo or metal trellis pushed into the substrate will support a vining cucumber ('Patio Snacker'), peas, or pole beans through the season. Anchor with the pot, not the wall.
Over-the-railing rail planters with explicit weight ratings. Read the spec; most consumer-grade rail planters are rated for under fifteen pounds (seven kilograms), which is roughly one filled three-litre planter. Overload them and you will discover gravity the hard way.
Free-standing tiered shelving — a three-tier metal plant stand against a wall lets you stack basil, parsley, lettuce, and chard upward without attaching anything to anything.
Pocket planters hung from a tension rod wedged into a doorway or balcony archway — no holes, herbs at eye level.
What I do not recommend in a rental: anything that requires drilling, anchored modular wall systems, masonry planters, or "living walls" sold by interior-design startups. The deposit math is rarely in your favour.
Mistakes urban growers make
The pattern of failure is consistent enough across new container gardeners that it is worth listing. Of the new urban growers I have worked with through Toronto Urban Growers since 2017, the same handful of errors account for most of the dead plants:
Container too small. A four-inch nursery pot is for a six-week-old transplant, not a season's home. Five gallons minimum for any fruiting crop.
Garden soil instead of potting mix. Garden soil compacts in a pot, drains poorly, and kills roots by suffocation. Use a peat- or coir-based container mix.
No drainage holes. A pot without holes is a bog. If you bought a decorative cachepot, drill it or use it as an outer sleeve only.
Drainage saucer overflowing onto the neighbour below. Empty saucers weekly. This is a social problem before it is a horticultural one.
Wrong light placement. Putting a tomato in the only spot that gets two hours of sun per day. Light-map first.
Ignoring HVAC exhaust. The building's air-conditioner exhaust port can desiccate plants placed in the airflow within days. Walk the balcony in summer to feel where the hot air comes out.
Forgetting to feed. Container plants exhaust their potting-mix nutrients within four to six weeks. A weekly half-strength liquid feed from week six onward is the difference between a productive plant and a stalled one.
Starting too many plants. A 4-by-6 balcony will not support the seed catalogue. Start with three to five containers in year one.
Ignoring lease and HOA rules. Read before you build. Get permission in writing.
Overwatering. More container plants die from drowning than from drought. The finger test, every time.
Loading image...
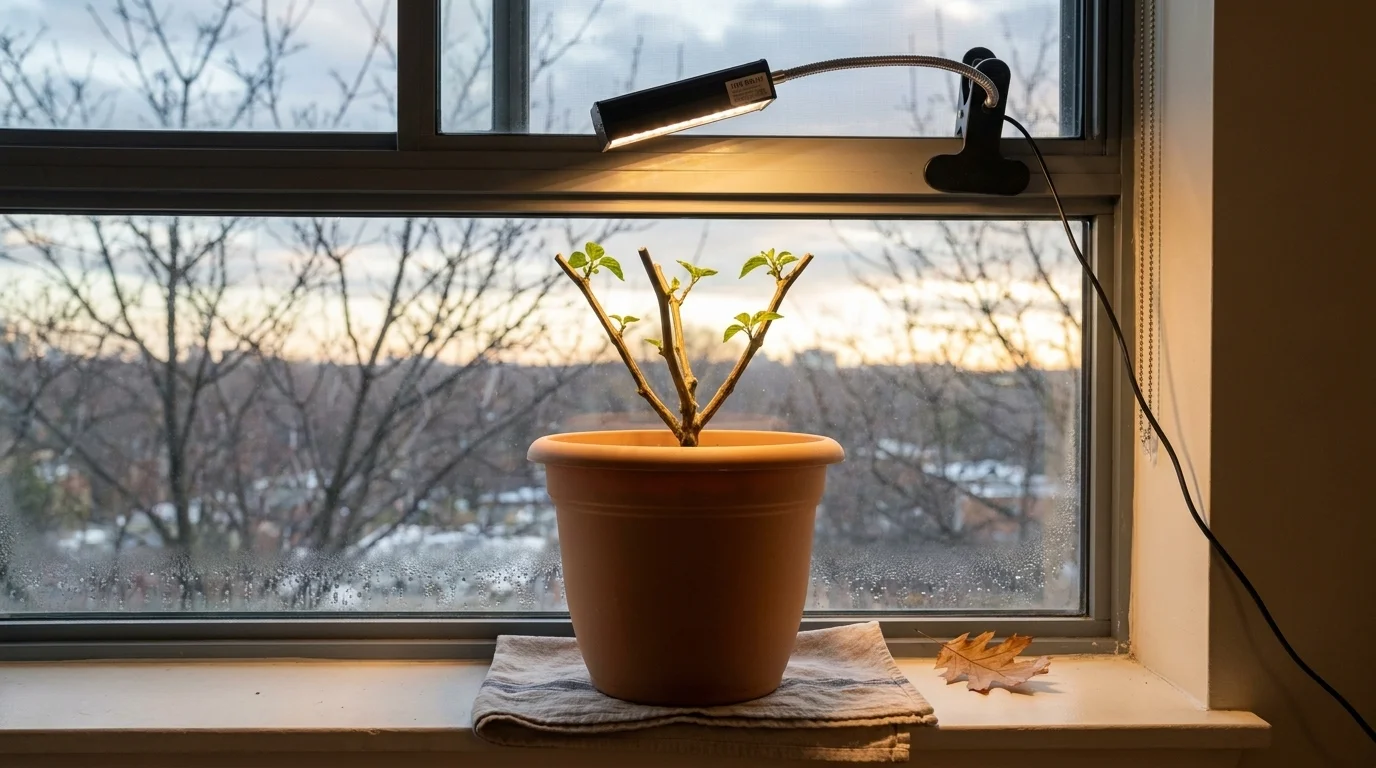
Chilies are perennials we treat as annuals. Prune to the framework, repot, clip a $20 LED to the sill — and you have a five-year plant instead of a one-season disposable.
Indoor overwintering for renters with no garage
Most overwintering advice assumes a garage, a basement, or an unheated greenhouse — none of which a typical urban renter has. There are two crops where the indoor option still works.
Tender herbs. Basil will not survive winter, but rosemary, mint, parsley, chives, and thyme will, on a south- or west-facing windowsill with at least four hours of direct sun. Cut them back by a third before bringing them inside, water roughly half as often as in summer, and accept that growth slows dramatically from December to February.
Chili peppers. Pepper plants are perennials in their native range, treated as annuals in cool climates only because the first frost kills them. Bring a 'Snackabelle Red' or other pepper inside before night temperatures drop below 50°F (10°C), trim it back to the main framework, place it in the brightest window you have, and you will get a head start of six to eight weeks on next season.
A 2-foot (60 cm) clip-on LED grow light pays for itself if your windows are marginal. Look for one rated above 30 watts of true draw — anything advertising "1000-watt equivalent" without the actual draw printed is marketing.
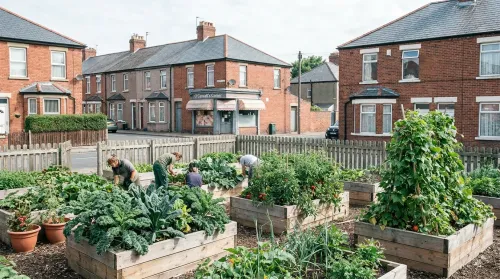
Community plots when the balcony runs out
A balcony has limits and there is no shame in admitting where yours starts. The American Community Gardening Association maintains a directory of municipal community gardens at communitygarden.org, and most North American cities run waitlists you can join now. Plot fees in Toronto run about thirty to seventy dollars a year for an 8-by-10 bed, which is roughly one season of supermarket basil.
For the building itself, a quiet pleasure of urban container gardening is meeting the neighbours who also have pots out. A messaging-app group of three or four balcony growers in your building will save you from the third year I had — when I went away for a long weekend, came back to a heatwave, and lost a determinate tomato that a neighbour with a watering can could have rescued in five minutes.
Your first season: a thirty-day starter checklist
If you are reading this in April, before peak planting, here is the smallest possible commitment that will produce a harvest:
Days 1–3. Light-map the balcony with the phone-photo protocol. Identify your two sunniest spots.
Day 4. Read your lease for planter restrictions. Photograph the relevant clauses.
Days 5–7. Buy two five-gallon fabric grow bags or plastic pots, one bag of container potting mix, one self-watering kit (or build a SIP from two nested totes for under twenty dollars).
Day 8. Buy one transplant: a 'Veranda Red' tomato or a 'Patio Snacker' cucumber. Buy seeds or starts of one herb you actually use weekly.
Days 10–14. Plant. Water in deeply. Set a phone reminder for every other morning.
Day 21. First feed: half-strength liquid fertiliser.
Day 30. Walk the balcony at three different times of day. Note which plants have outgrown their light, their pot, or their place. Write it down for next year.
That is the minimum viable balcony garden. Two pots, one tomato, one herb, thirty dollars in materials, no holes in the wall. Once it is keeping you in cherry tomatoes and basil through August, the next season will design itself.
Determinate cherry tomatoes ('Veranda Red', 'Tiny Tim'), bush peppers ('Snackabelle Red'), 'Patio Snacker' cucumber, leafy greens (Buttercrunch lettuce, Swiss chard), bush beans ('Porch Pick'), and herbs (basil, parsley, chives) thrive in 5-gallon-or-smaller pots. Pair the cultivar to the container — most failures come from oversized plants in undersized pots.
What's the minimum container size for tomatoes?
5 gallons (roughly 14 inches wide, 12 inches deep, or about 19 litres) for determinate or 'patio' varieties; 7 to 10 gallons for indeterminate types. Below 5 gallons the soil dries faster than the roots can drink and yields collapse — this is the universal minimum from University of Maryland Extension and other extension sources.
How often should I water container plants on a balcony?
Daily check in summer with the finger test (one inch deep — if dry, water until drainage appears). Small pots in direct afternoon sun may need watering twice a day during heatwaves. Self-watering containers with reservoirs can stretch this to once weekly. Morning watering is preferred to avoid overnight fungal issues.
Can I container garden without a balcony?
Yes. Sunny windowsills support herbs and microgreens; bright window setups with a clip-on LED grow light handle leafy greens and cherry tomatoes. Communal rooftop gardens, allotments, and shared building courtyards extend options for renters with no outdoor space — the American Community Gardening Association maintains a directory at communitygarden.org.
How do I know if my balcony can hold a heavy garden?
Most residential balconies are rated for 40 to 100 pounds per square foot of distributed live load. A filled 5-gallon container weighs about 50 pounds, so two filled containers per square foot is the practical ceiling. Place the heaviest pots closest to the building wall, not near the railing. Check your lease before drilling or hanging anything; California renters and condo owners are subject to SB721/SB326 balcony inspections under AB 2579, with a 1 January 2026 deadline.
Do self-watering containers actually work?
A well-designed sub-irrigated planter (SIP) — two nested containers, a fill tube, an overflow drain at the reservoir line, and a wicking column of potting mix — can hold a determinate tomato through a 72-hour heatwave without manual watering. Cheap big-box self-watering pots often fail because the reservoir is too small and the wicking strip is undersized. A DIY build from two nested 8-gallon storage totes costs around $14.60 in materials and outperforms most retail products in the same price range.
10 Innovative Ways to Maximize Small Spaces for Your Home Garden
Join
Loading...
Our Green Community!
Loading...
VerdeNook is more than just a source of gardening wisdom; it’s a platform for sharing, learning, and growing together. We invite you to join our community, share your stories, and spread the joy of gardening. Let’s sow the seeds for a greener, healthier, and more sustainable future, one garden at a time.