Cultivating Resilience: Tales of Triumph in Home Gardening
Share this article:
Press a thumb an inch into the bed; if the print holds sharp edges, you are below field capacity, not catastrophically dry — the most useful ten seconds in a garden.
A tomato plant in my research allotment in Norwich went soft at the base of the stem one Wednesday in late June, and by Friday the lower leaves had yellowed and were beginning to drop. The plant was not dying of heat, although the week had been hot; it was dying of overwatering, which is what most readers do when their plant looks stressed and the soil sensor on the workbench is still flashing green. Knowing how to revive a dying plant is, in the great majority of cases, a question of correctly identifying what is happening at the root and what is happening at the leaf — and then doing one specific thing, often the opposite of what intuition suggests. This guide walks through that diagnosis and that intervention, and then closes with the harder question that nobody on the search-results page seems willing to ask: whether the plant that just struggled is, given the warmer USDA hardiness zone you may now be gardening in, the right plant for the bed at all.
The literature on plant revival has changed in two important ways in the last two years. The first is that combined drought-and-heat stress is now treated as a distinct physiological category — the 2025 MDPI review on the topic finds that plants under both stresses simultaneously show delayed leaf gas-exchange recovery even after irrigation resumes, in a way neither stress alone produces. The second is that the USDA's 2023 hardiness-zone-map update moved roughly half of the contiguous United States into the next warmer half-zone, which means the plant that did well in your bed five years ago is now growing in a different climate without having moved. Both findings shape the protocol that follows.
First diagnose what's actually wrong
Press a thumb gently into the soil one inch below the surface. If the print holds sharp edges and the soil is cool to the touch, the bed is below field capacity but not catastrophically dry. If the print collapses into a slick, smells faintly sour, or shows free water, you are looking at overwatering and probably the beginnings of root rot. If the soil resists the thumb entirely and the surface has a pale, beaded crust, you are looking at hydrophobic dryness — the soil is so dry it is repelling water. This is the single most useful diagnostic any home gardener can run, and it takes ten seconds.
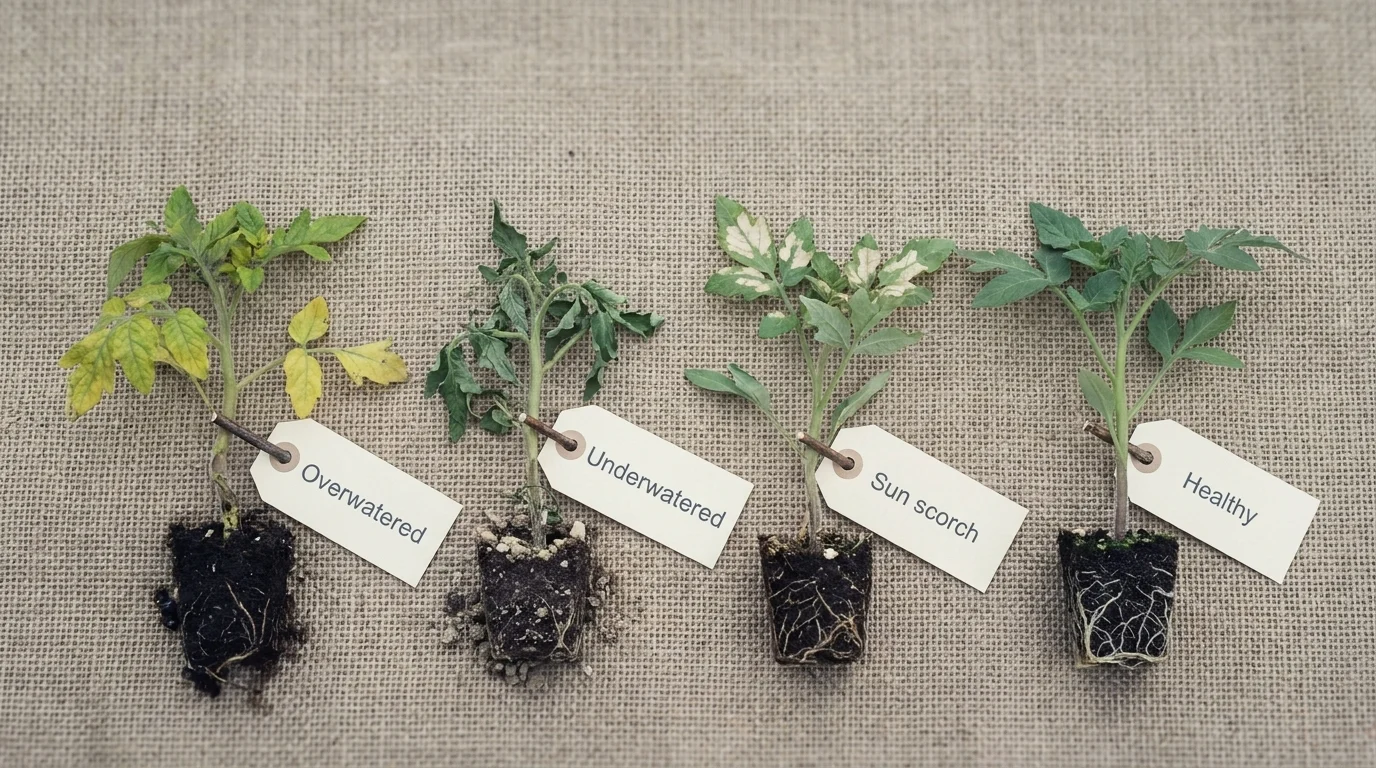
The leaf evidence narrows the picture. The table below is the matrix I keep on the wall of my research shed, with the cellular cause and the action laid out next to each visible symptom:
Visible symptom
Likely cause
First action
Lower leaves yellowing, soft stem at the base, soggy soil
Overwatering, oxygen starvation at the roots, incipient rot
Stop watering, move to shade, lift the plant and inspect roots for mush
Slow deep soak of the root zone, then mulch two-to-three inches around the base
Crispy brown leaf edges, dry soil, midday wilting
Heat stress, often layered on top of underwatering
Water at root zone in early morning, apply afternoon shade cloth, no fertiliser
Wilting that does not recover by evening
Root failure (rot, severance, or root-zone over-temperature)
Lift plant, inspect roots, trim mushy or black tissue, repot in fresh well-drained medium
White or pale patches on upper leaves, scorch-shaped
Sun scorch following a sudden exposure shift
Provide partial shade for one to two weeks, do not prune affected leaves yet
Sudden general collapse without obvious cause
Possible vascular wilt (fungal or bacterial pathogen)
Isolate plant from neighbours, do not compost, consult extension service
The matrix is the article's anchor element because the great majority of plant-revival failures begin with a misdiagnosis. The most common one I see is overwatering treated as underwatering — the leaves yellow and the gardener responds by watering more, which is the correct treatment for one of the two causes and the worst possible treatment for the other.
Loading image...
The most common revival failure is overwatering treated as underwatering — yellow leaves, the gardener waters more, and the wrong half of the diagnosis sinks the plant.
A five-step recovery sequence
Once you have diagnosed the problem, the recovery sequence is the same for nearly every cause, with the specific action substituted at step four.
Step one — diagnose, using the matrix above. Skip this step and you will treat the wrong condition.
Step two — triage. Remove any leaves or stem material that is unambiguously dead — black, mushy, or hollow. Living material at the base of a damaged plant is your route home; dead material at the top is metabolic dead weight the plant cannot afford to maintain while it is healing. Do not over-prune; you are removing the obviously gone, not pre-empting the merely struggling.
Step three — inspect the roots. This is the step most home gardeners skip and that nearly every successful revival depends on. Lift the plant gently from the pot or carefully excavate around the root ball in a bed. Healthy roots are pale, firm, and slightly fragrant of mushroom and damp wood. Rotted roots are dark, soft, and smell sour or sulphurous. Trim the rotted roots with clean secateurs back to firm white tissue; do not be sentimental about how much you remove. A plant with a third of its original root mass and healthy tissue will recover; a plant left with rotted roots will not.
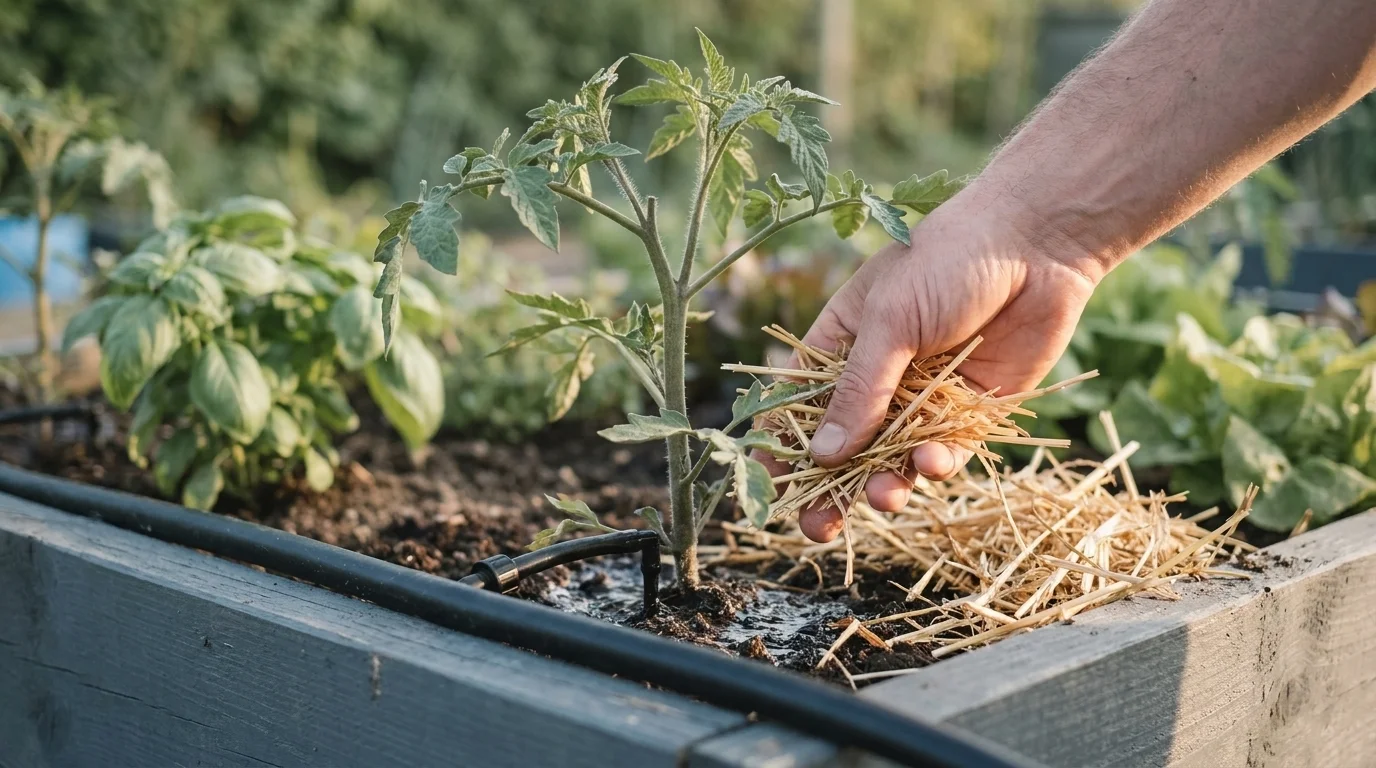
Step four — correct the water regime. For overwatered plants, repot into a fresh well-drained medium and do not water until the top inch of soil dries fully. For underwatered or heat-stressed plants, water the root zone slowly and deeply in the early morning so that the moisture reaches the rhizosphere before evaporation peaks. The single most useful change for an outdoor garden in a dry summer is to switch from overhead spray to a drip line; drip irrigation reduces water usage by thirty to fifty per cent compared with overhead by delivering water directly to the root zone.
Step five — establish the recovery zone. Move container plants to bright but indirect light for one to two weeks. For outdoor garden plants, apply afternoon shade cloth or strategically placed taller plants to reduce the heat load during recovery. Do not fertilise. A stressed root system cannot support the rapid growth that nitrogen triggers, and a feeding push on damaged roots is a reliable way to finish off a plant that would otherwise have recovered. The rule the Memphis Area Master Gardeners state most directly is the right one: no fertiliser during heat or active recovery.
When heat and drought hit together
The 2024 and 2025 plant-physiology literature has begun to treat combined drought-and-heat stress as a distinct category, and the practical gardener should too. The MDPI 2025 review on the subject reports that plants under simultaneous drought and heat show measurably delayed leaf gas-exchange recovery even after irrigation has resumed — that is to say, the stomata that close under the combined stress do not reopen at the same pace they would after either stress alone. The implication is that the recovery window is longer when both stresses occur together, and the corrective regime needs to be gentler.
The protocol that follows from this is essentially restraint:
Water slowly and deeply, at the root zone, in the early morning. Surface watering during a heat wave evaporates before it reaches the rhizosphere. Drip lines or a slow trickle from a soaker hose at the base of the plant are far more effective than the same volume of water sprayed across the bed.
Apply two to three inches of mulch. Mulch reduces soil-surface temperature by several degrees, slows evaporation, and keeps soil-moisture conditions stable enough that the recovering root system is not whiplashed between extremes.
Do not prune during the stress. A plant pushing out new growth from pruning wounds is committing root resources it cannot spare.
Do not fertilise. As above, this is the most common revival mistake and the easiest to avoid.
Provide afternoon shade for vulnerable beds. Shade cloth at thirty to fifty per cent transmission, or simply repositioning a row cover, can reduce the heat load enough to keep the recovering plant within the range its photosynthetic machinery can manage.
The honest summary is that combined drought and heat is the conditions under which most home-garden revival attempts now fail, and the fix is to act less rather than more.
Loading image...
Drip irrigation at the root zone cuts water use by thirty to fifty per cent versus overhead spray; mulch slows evaporation and keeps the rhizosphere stable.
How long recovery actually takes
The recovery timeline is the question I get asked more often than any other, and the honest answer is that visible recovery typically takes up to one month, with the first one to three days being stabilisation rather than growth. In that first short window the plant is not dying any faster — the wilting will plateau — but it is not yet visibly recovering either. The temptation to do something further during those days is the temptation to make the situation worse.
After roughly a week, you should be looking for the first signs of new vigour — a slight stiffening of the lower leaves that remained, a small bud forming at a node that was previously inactive, a fresh root tip appearing at the soil surface if the plant is potted. After two weeks, new leaf growth should be visible. After a month, the plant should be substantively recovered, although a plant that has lost a third or more of its root mass will not return to its pre-stress size in the same season.
If the plant has shown no improvement at all after two weeks, the diagnosis was probably wrong, or the damage to the vascular tissue was greater than what was visible at the start. Lift the plant again, inspect the roots and the lower stem carefully, and decide whether to start the diagnostic loop over or compost the plant and replace it.
Your USDA hardiness zone may have changed
The single piece of information I would want every reader to leave this article with is that the USDA Plant Hardiness Zone Map was rebuilt in November 2023 on thirty years of data, and that roughly half of the contiguous United States moved to the next warmer half-zone. The average warming across the relevant baselines was about 2.5°F. The map now uses 13,412 weather stations, up from 7,983 in 2012, which means microclimate resolution has improved as well.
The practical consequence is that the plant that nearly died in your bed last summer may be a plant whose old hardiness rating no longer matches your current zone. Look up your current USDA zone — it is free and searchable by ZIP code — and check whether it has shifted from the zone you remember planning for. If it has, the warm-edge species you originally chose may be operating outside their tolerances under heat events that are now within your normal summer range. This is the question the plant-revival article that does not raise it is failing the reader on.
After the recovery: building proactive resilience
A plant that has survived a stress event is a plant that has come closer to its physiological limit than you would have planned, and the proactive response is to design the next season's bed so that the same stress does not recur in the same way. The literature on resilient-by-design gardens converges on a small number of concrete moves.
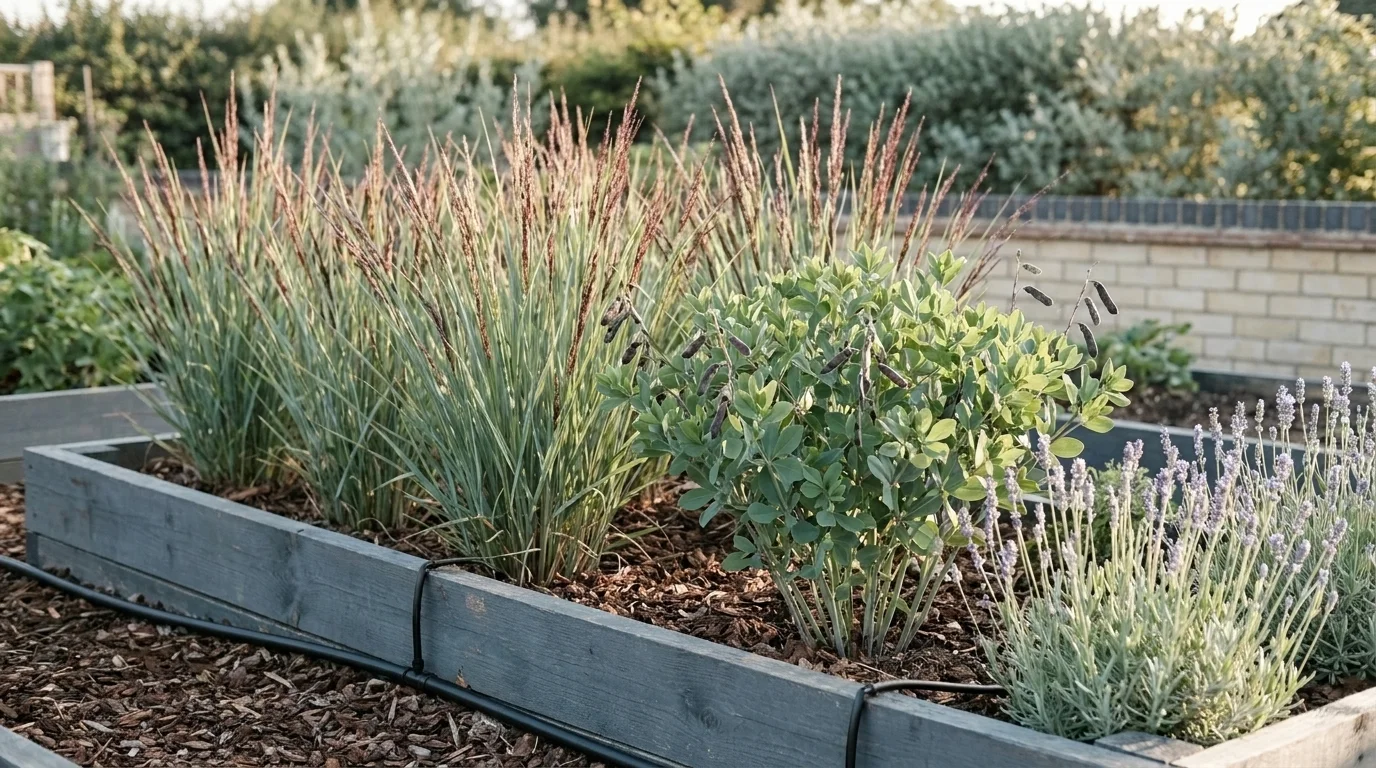
Choose climate-appropriate cultivars rather than fighting your zone. The Proven Winners climate-resilient guide names cultivars that handle heat and drought well: 'Cheyenne Sky' switchgrass (Panicum virgatum) for USDA zones 4-9, 'Pink Truffles' baptisia (Baptisia) for zones 4-9, lavender (Lavandula angustifolia) for zones 5-9, ornamental grasses generally, sedum 'Autumn Joy', yarrow (Achillea millefolium). Where possible, lean on plants native to the ecoregion you actually garden in — they have been selected by local conditions for considerably longer than any cultivar trial.
Convert from overhead to drip irrigation for the beds that consume the most water. Drip lines do not look impressive in the catalogue but they cut water use by thirty to fifty per cent compared with overhead spray, and they keep moisture at the root zone where photosynthesis depends on it, rather than evaporating from the leaf surface.
Audit your microclimate before the next planting cycle. Spend twenty minutes one afternoon mapping where the sun reaches each bed at nine, twelve, three, and six o'clock; mark the hot spots near south- or west-facing walls; note where water pools after rain. A bed beside a reflective wall is operating two to four degrees warmer than the same bed twenty feet away on the same lawn, and the plant choice should reflect that.
Mulch every bed with two to three inches of organic material. The first season, you will see the soil-moisture variability reduce. The second, you will see soil structure improve as the mulch breaks down into the upper horizon. The third, you will see the bed recover from stress events faster than the unmulched comparison, because the rhizosphere has stayed within a narrower range of conditions.
The original version of this article opened with the framing of resilience as a triumph of spirit. The honest version of the same thought is that resilience is the property of beds that have been designed so that the plant does not have to be heroic — soil that holds together under thumb pressure but releases water freely, plants chosen for the zone you actually garden in, irrigation that delivers water where the roots are, and a mulch layer that smooths out the days the weather goes badly. Build those and the dying-plant articles you find yourself reading next summer will be shorter ones.
Loading image...
Resilience is the property of beds designed so that the plant does not have to be heroic — right cultivar, drip line, and three inches of mulch.
How do I know if my plant is dying from too much or too little water?
Press a thumb one inch below the soil surface. Soggy or sour-smelling soil with yellow lower leaves and a soft stem points to overwatering and incipient root rot — stop watering, move the plant to shade, and lift it to inspect the roots for mushy or black tissue. Dry, crust-topped soil with crispy or curled leaves points to underwatering or heat stress — soak the root zone slowly and deeply in the early morning, then mulch two to three inches around the base. The single most common revival mistake is treating overwatering as underwatering, so confirm the soil condition before adding more water.
How long does it take to revive a dying plant?
Expect one to three days of stabilisation before you see any visible change — the wilting should plateau but no new growth will appear yet. Visible recovery typically takes up to one month, and combined heat-and-drought stress can extend the window further because the 2025 plant-physiology literature shows leaf gas-exchange recovery is measurably delayed under combined stress versus either stress alone. Do not fertilise a recovering plant; a stressed root system cannot support the rapid growth that nitrogen triggers, and feeding damaged roots is a reliable way to finish off a plant that would otherwise have recovered.
What plants should I grow to make my garden more climate-resilient?
Start by looking up your current USDA hardiness zone, because roughly half of the contiguous United States shifted to the next warmer half-zone in the 2023 map update. Then favour native species adapted to your ecoregion alongside proven drought-tolerant cultivars such as 'Cheyenne Sky' switchgrass (zones 4-9), 'Pink Truffles' baptisia (zones 4-9), lavender (zones 5-9), yarrow, and sedum 'Autumn Joy'. Pair plant choice with drip irrigation, which cuts water use by thirty to fifty per cent compared with overhead spray by delivering water directly to the root zone, and with two to three inches of organic mulch to stabilise soil-moisture conditions across hot days.
How do I help a plant survive a heat wave?
Water slowly and deeply at the root zone in the early morning so the moisture reaches the rhizosphere before evaporation peaks; apply two to three inches of mulch to retain soil moisture and cool the root zone; do not prune and do not fertilise during the heat wave, because both signal the plant to push new growth its stressed roots cannot support; and provide afternoon shade with thirty-to-fifty-per-cent transmission shade cloth or strategically placed taller plants for vulnerable beds. The 2025 combined-stress literature shows that restraint outperforms intervention when both drought and heat are active.
Join
Loading...
Our Green Community!
Loading...
VerdeNook is more than just a source of gardening wisdom; it’s a platform for sharing, learning, and growing together. We invite you to join our community, share your stories, and spread the joy of gardening. Let’s sow the seeds for a greener, healthier, and more sustainable future, one garden at a time.